Sunday, May 18, 2014

DIY LEMONADE FACIAL - Smaller pores, healthy glow


The deep clean of this sweet and sour concoction will help to minimize the look of pores and scrub away dead skin cells to reveal soft, smooth, glowing skin.

What you'll need:

A half a lemon

2 tablespoons of organic brown sugar

1/2 teaspoon olive oil


How to use:

Squeeze out the lemon juice and add the sugar and Olive oil
to a container

Mix together to form a paste

Wet your face
Use the paste to scrub circular motions all over face for about a minute
Let the lemonade sit on your face for 15-20 minutes or until dry

Rinse and finish with moisturizer of choice.

Tips:  Skip the toner
The citric acid in the lemon already works as a toner and the chemicals that come with your store bought may counteract the natural vitamins being delivered directly to your face by the lemon.

Hey, comment or email me and let me know if you tried it and if it works for you.
I know some people use different oils like Jojoba and Apricot.

Thanks for reading!

Saturday, May 10, 2014

Raw Black Soap Review

Raw Black Soap


What is it?

Raw Black Soap is also known as "Anago Soap", "Alata Simena",or "Ose Dudu". Which I found hilarious, because that's exactly what I thought it looked like. A big chunk of dried feces

It's black/brown in color, and made from plantain skin, cocoa pods, palm kernel oil, palm oil, and African shea butter, among other all natural ingredients.

The soap is filled with vitamins and minerals, not tested on animals and is completely 100% organic and free of any harsh chemicals, sulfates etc. 

What is it used for? 

Great in fading away dark spots, but won't bleach your skin or make you appear any lighter.

 Can also be used as an anti-fungal remedy because of its antiseptic properties. It evens out skin tone, eliminates blemishes and acne, and aids in the removal of makeup.

What does it look like?

Black soap comes in various types of packaging, the most common being wrapped with clear plastic and stamped with a paper label. 

 I saw some being sold in a round, plastic, ice cream looking container once. Which is good, because then you won’t have to worry about storage.


Raw black soap is usually different shades of browns. Hard in texture at first, but soft and squishy when wet. Like putty .  

Some so-called "organic" brands will try to sell soap that is just black in colour, with a smooth more commercialized type of texture, labelled as “Black Soap”. 

These soaps are big fat imitations and don't even have nearly half of the nutrients as natural raw black soap, and I'll tell you why...


These soaps have undergone a process to expand their shelf life and to ultimately give the soap a more commercialized finish.  

While some may still have the main ingredients in them, they have lost a lot of their natural vitamins and minerals because of the processes.  Many of the "fakes" also have harsh dyes & chemicals added to them, which you want to stay away from if you're trying to go "organic".

How to use:

If your soap comes in a plastic wrap like mine, it may be a bit of a challenge to get the soap out. Make sure you remove the paper label first and then, unravel the plastic.

 Some pieces of plastic tend to sink into the soap and may not want to come out, don't worry about it.

Once removed, you will also need to transfer the soap to a container.  That's if your soap doesn't already come with one (Fancy!). 

Here, I wet the soap, broke it up into chunks and stuffed it into a small container.

You can find different and creative ways of storing your black soap.  It’s also very mold-able when wet so you can wet it and scoop/squeeze it into containers of different shapes and sizes.  

A friend of mine scooped some into a clean applicator bottle, added distilled water, and shook it up to make a liquid cleanser.  

It’s that versatile, like putty. So you can also play with the textures by going from liquid, to hard, to creamy.

First…

·         Wet face

·         Break off a tiny piece of the soap (no bigger than your fingernail)

·         Work up a good lather in your hands first before massaging on face

·         Check and remove sharp or hard remnants from lather if any. Sometimes shards of stone or wood may have made their way into your black soap during it's creation (You don't want to go slicing up your face like a serial killer)

·         Massage into face or body for a good 1-2 minutes

·      Rinse
(Repeat only if necessary)

·         Continue your usual skin care routine


Review/ Conclusion:

I've been using black soap for the past 6 months and I haven't even had a thought about using anything else.

I feel as if my skin is really getting that deep “down-to-the-pore” clean. It balanced out my skin tone to the point that I only need to use concealer under my eyes (which is my problem area) and sometimes not at all. 

With continued use it smoothed out my skin out to an almost velvety finish.

Also great for removing face makeup. Though it may not completely remove your eye makeup, like your mascara and eyeliner. 

For people who have really dry skin I would recommend using this sparingly and with a decent moisturizer, as it can actually have a drying effect. 

Simply follow up with a PH balancing toner, your moisturizer afterwards, and your good to go.

Skin will feel clean, soft and appear smoother. If you have acne you may notice a big difference in the texture of your skin with continued use.

Of course with every organic product, it takes a while to see results. The reward is not only looking great in the long term but knowing you made a big contribution to your skin healthy wise.


Tuesday, November 26, 2013

DIY MULTIPURPOSE CLEANSER & ROOM FRESHENER

Hover your mouse over to add to Pinterest

A lot of store bought cleaning agents contain harsh chemicals that are not only bad for the environment, but also your health. To share my personal proof of that; my mom lives with me, and suffers from a bronchial condition. When she insists on cleaning (she's somewhat of a neat freak), the vapours from the chemicals in the agents make her cough violently and almost always, have her reaching for her inhaler.

Naturally I worry. So I went online and discovered that lots of people have been making their own cleaning agents out of regular household items and with more organic cleaning alternatives.

This one I made, I gave one to my mom, and she has had zero coughs when she goes on her cleaning binge. It gets the job done just as effectively as a normal agent would, smells great with my customized scent, but isn't as strong. Surprisingly, the scent is also more lasting and it gets out stains and cleans effectively.

Also works wonders on my pocket!

Here's basically what I used to make mine, you can customize your own scents and cleaning agents to your liking.
 If you are using a bigger bottle than what I used, you will definitely need to use more ingredients than the measurements listed below.

Vinegar 1/2 cup
Water
1 tsp Baking Soda
1/2 Lime
Essential oils for fragrance 5 drops ea.
Small spray bottle/mister
Sticker/label
Funnel

  • Screw the lid off your spray bottle and place the funnel over the opening.  
  • Pour your vinegar down the funnel and squeeze in your half a lime.  
  • Add your 1 tsp of baking soda. The baking soda will cause the vinegar and lime mix to create a big "fizz".  
  • Take the funnel off and allow the fizz to die down, whatever you do, give that mixture air to breathe and DO NOT SHAKE!  Your bottle might just explode on you if there is a build up of pressure inside. 
  • Stir with a spoon instead.
  • Fill the rest of the mixture with water (preferably distilled, especially if a bigger bottle).  
  • Leave the mixture uncovered for about 5 minutes.  
  • Decide which essential oil scents you would like to add.  I added sandalwood and plumeria.  You can also try mixtures like green tea and lavender or jasmine. Anything that will put you in a relaxed and comfortable state of mind. 
  • Use a sticker or label to label your concoction.
  • Spray on surfaces and wipe clean with dry cloth
  • Great for: Bathroom, kitchen, closet, bedroom, living room, office space, I even put some in my laundry!
Now go make your own and save your wallet, and the environment :) !


Tuesday, November 5, 2013

PAINTED GARDEN BUGS

Font by Fonts for Peas

I had these stones that I collected out by the airport a while back on a road run with some friends.  I didn't know what to do with them. I just saved them and knew that one day their purpose will be revealed.  

So the garden needed some sprucing up! Flowers are nice and all, but I think I would like my garden to have some surprises! Little hidden objects tucked away between pots and flowers would be nice, but I can't just tuck any old toy car in a corner and call it art. 

So I came up with garden bugs. 

I did a little sketch of a ladybug, a bee and a June bug.
I stuck with bugs that are round in shape, although the shape of the stone shouldn't matter.  My ladybug had a long as hell butt and the stone for the bee is ill-shaped. The sketches aren't always going to turn out the same as the actual work of art but who cares! I think they turned out great.

What you'll need

  • Acrylic Paints (Colours of your bugs)
  • Number 1-3 paint brushes (a.k.a small and pointy)
  • Smooth stones
  • A black Sharpie marker

The Ladybug

First I outlined the basic shape of my lady bug using my black Sharpie.  A semicircle for the face, two ovals for the eyes and the split down the back for the wings. 


Then following my drawing I first filled in the base colour of the lady bugs' back which is red.  You can get creative and do different colour lady bugs too.  I tried not to go over the  outlines with the paint brush, but even if you do you can always go back over the outlines with the Sharpie pen after the paint is dry.

Then I filled the ladybug's face with black with the exception of the ovals for the eyes where I used the white instead.
After about 5 minutes of  dry time after applying the white in the eyes, I used my Sharpie and created the spots on the ladybug's back and coloured in two smaller ovals for the pupils in the eyes.  I also went over any outlines I may have painted over by accident.
And there we have our basic rock ladybug.

The Bee

This is the first outline for the bee.
I drew the wings before I drew the stripes.

This is what the outline looks like after I added the stripes

Then I filled in the face with yellow and yellowed in between every other stripe after that.  Leaving out the eyes and trying not to go over the mouth.  You can always save the eyes and mouth for last of course, but this technique makes for less paint clumps and a neater finish.

Added black to the stripes that were left unfilled.  See how I went around the wings with the paint?

I put the white where needed i.e. on the eyes and the wings.

After a 5 minute dry time I put pupils in my bees eyes with my Sharpie pen, and went over any incorrections.

 The Junebug

This is a perfect example of how things don't always turn out the way you draft them.  The shape of the rock vs. the shape of the sketch is way off.  But I think it made for a better finish anyway.

Starting with the face I filled it with green 
I knew I wanted a gradient so I did green strokes on the outside, and stroked them inward.

Then I did a lighter green starting a little way on the original green and stroked that in inward as well but filled up more space and came further in with the strokes.

I used the same inward stroke motion and did the remainder of the bug in yellow.  Once again trying to avoid the lines, but if not...no big deal.

So set it down to dry.  Of course you can clearly see my mistakes going over the outlines.....

....which once dried, I corrected with my Sharpie :)

And there we have the finished June Bug.  Much better than the draft I think!


Mini photo shoot! lol
Let me know how your garden bugs turn out!!


Friday, October 12, 2012

LAPTOP SHUTTING DOWN DUE TO OVERHEATING?


TRY THESE COOL DOWN TIPS THAT WON'T COST YOU A DIME

You’re worried because your laptop keeps shutting itself down and off every 10-30 minutes.

You feel the keyboard and the back and it feels very hot. It’s overheating.  What do you do?

You keep restarting, but it barely stays on long enough for you to Google a decent resolution. 

Don’t freak out just yet; don’t go running so quickly to the technician.

Instead try these quick, simple, cool down tips that will instantly cool your laptop down and put you back in business.

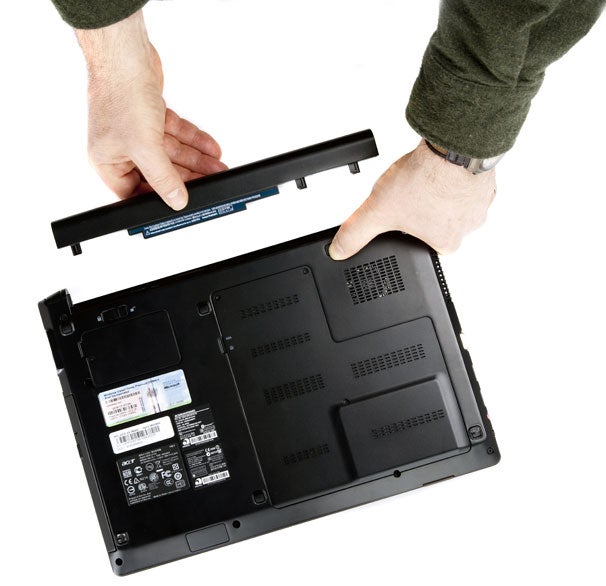
Remove the battery
If your laptop is at home or always plugged in on the charger at the office or wherever, you won’t necessarily require the use of a battery. Plus, the charger works overtime, constantly charging the battery which will cause it to produce a lot of unnecessary heat.

Choose one or the other, plug out the charger from the laptop or remove the battery while using the laptop on the charger.  This is an instant cool down for your laptop.  You will also increase the longevity of your battery.

Be sure after removing the battery, to store it in a cool dry place.


Elevate the laptop
Most laptops have their cooling fan on the left under side closest to the monitor. This fan is prone to attracting a lot of dirt, smoke, dust and things like that. 

If the laptop is usually in one place and hardly moved it won’t have much space for air to pass through and that will cause a lot of hot recycled air to circulate throughout the computer.

Prop the laptop on a wide hard cover text book shifting a space out for the fan, so that enough fresh, cool air will pass through for the fan to cool it.


Power Options  
Change the power options on your battery and charger.

Right click on your battery icon in the bottom right tray on your screen > click on Power Options > whichever power plan you’re on click “Change Plan Settings” > then click “Change Advanced Power settings” >
From the drop down box that says “Maximum Processor State” reduce your “on Battery” or “On Plugged In” to about 99% to 97% depending on amount of usage.

Download a CPU temperature monitor like CPUID or REAL TEMP to keep tabs on your battery and CPU temperature.
If you already had a temp monitor you will notice that the degrees will go down drastically depending on how much percentage you went down from a hundred.

For performance purposes I wouldn't go down more than 3%.


Tabletop fan
This might be your only purchase and may not even be necessary if you already have a regular fan that can be placed in a convenient location that will be able to blow cool air from the side of the laptop where the cooling fan is located. 

If you have the laptop propped on an elevated surface this is perfect for the cooling fan to take in the flow of cool, steady pressure of air from the table top or ordinary fan, which will circulate throughout the laptop instantly delivering a cooling route to its mechanisms.


I personally have had major problems with my laptop shutting itself down and not restarting. Lost a lot of work because of it too.

I was amazed at how these simple changes to my usage made a difference to the temperature and my laptops overall performance. 

I hope if you have similar problems you will find this article useful.

In the case that you have tried all these methods and you still have issues with your computer shutting itself off, don’t hesitate to have a professional take a closer look at it. 

Your copy of Windows may not be genuine and you may be using an Evaluation version. Apart from that you might be experiencing issues with your motherboard which will require more thorough servicing. 

Whatever the cost, it’s not worth losing your entire information over something that may have caused just a couple of bucks to be looked after professionally.

Saturday, September 22, 2012

THE MESSY BUN


The Messy Bun was personally one of my favorite trends for the summer and I believe it will definitely make its cross over into the Christmas to New Year season. Extremely easy to do with very little requirements.  All you need is your hair, a few pins, comb and brush. No heating required, no shoulder straining elaborate brushing.  
Here are a few I admire, and have tried myself.


Step 1: Flip hair over and brush the hair up onto the very top of your head, secure with hair elastic.

Step 2:  Plait the ponytail loosely from the back and carry the plait forward towards the forehead.

Step 3: Fold the ends of the plait under and secure with bobby pins

Step 4: Use a tail comb to tease and further loosen the plait.

Step 5: Spritz with a finishing spray and brush up fly aways.  You can also use gel to tame loose hair.


Step 1:  Grab hair into a ponytail and pin at random angles to create a perfect mess

Step 2:  Brush up loose hair away from face and nape of neck

  Step 3: Scrunch the hair forward creating a hump, put a head band behind and in front of the hump.

Step 3:  Spray with finishing spray


Step 1:  Part hair with fingers down the middle, loosely french braid both sides

Step 2: Secure hair at nape of neck by wrapping and pinning, leaving the ends out.  The amount of times you wrap the hair determines how much of the ends are left out.